How to do a full year of bookkeeping when you need it done yesterday – Part 2

Hello again, ready to dive back in? In my previous post, How to Do a Full Year of Bookkeeping When You Need it Done Yesterday – Part 1, I showed you how you can connect QuickBooks to your bank account and import banking transactions into QBO. By now, you have accomplished getting all of your business’ bank and credit card accounts connected with QuickBooks Online, and worked through importing your years’ worth of transactions. Great job!
You are now rested & ready for How to Do a Full Year of Bookkeeping When You Need it Done Yesterday – Part 2. In this blog post, I will show you what to do with all these transactions.
Get ready
As I said in my previous post, this will require dedicated time and attention. As they say,
Rome wasn't built in a day. You can't expect to do one year's worth of bookkeeping overnight.
Click To Tweet
Rest assured, you will get it done – with a little patience and focus. Go ahead and refill that cup of coffee, block out any distractions, and dive in.
What you should have completed
To review, at this point, you’ve read How to do a full year of bookkeeping when you need it done yesterday – Part 1 and have accomplished the following:
- Purchased QuickBooks Online
- Become familiar with QuickBooks Online (by watching my YouTube videos)
- Connected QuickBooks Online to your business bank and credit card accounts
- Imported banking transactions that didn’t download into QuickBooks Online (from your bank or by using PDF2XL or PDF2QBO)
- Watched my video on working with downloaded banking transactions – to walk you through the basics of working with downloaded transactions in QuickBooks Online.
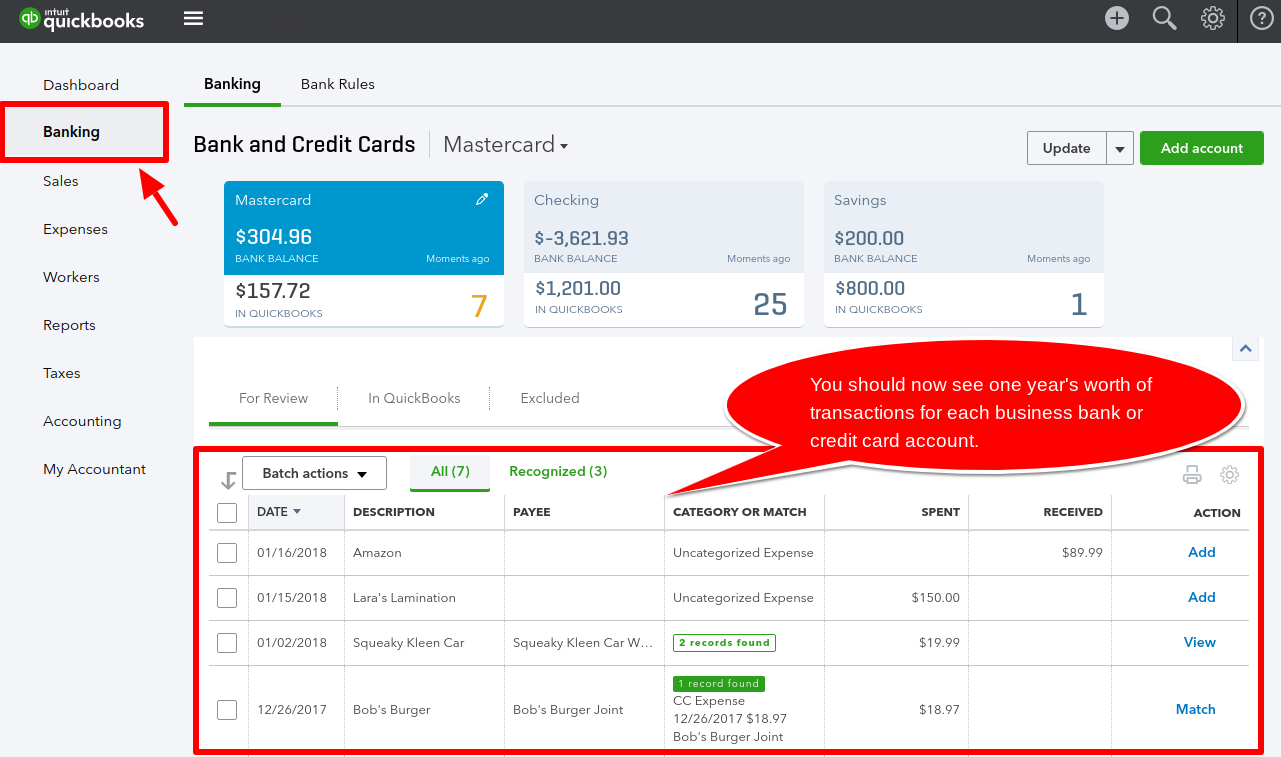
You should now be able to see one year of banking transactions in the QuickBooks Online Banking Center.

Learn about working with downloaded banking transactions
If you haven’t done so already, you need to watch my overview video on working with downloaded banking transactions. This video will walk you through the basics of working with downloaded banking transactions in QuickBooks Online.
Categorize banking transactions
The next step is to categorize all the banking transactions. In QBO, click on Banking on the Left Navigation Bar.
How to categorize Expenses (Money Out) transactions
At this point, I want you to work with expenses only (the amounts under the Spent column). Also, work with one bank account at a time.
![]()
Starting with the oldest transactions, assign a Payee (vendor name) and a Category to each transaction.
When you type in the vendor name in the Payee section of a transaction, QBO will pull up matching a matching name. You can select that name and move on to the category. If QBO does not recognize the name you typed in, but you know it is a vendor you have used in the past, do a quick search trying different variations of the name that you may have used in the past. This will help you avoid making duplicate vendors. If the vendor is a new vendor, make sure to create a new vendor, instead of leaving the Payee name blank. Creating a new vendor only takes a few moments. Read this blog post to learn how to add new vendors in QuickBooks Online.
The Category list is the same as the chart of accounts. It tells QuickBooks how to categorize the expense. For example, a purchase from Office Depot may be categorized as Office Supplies Expense.
Click on each transaction to edit the transaction. Make sure that you change any categories from Uncategorized Expense to the correct expense category. There should be no expenses added to Uncategorized Expense. Read this blog post if you have accidentally recorded transactions to uncategorized expenses.

For any checks, you’ll need to view the check image to get the Payee name (the name of the person you wrote the check to). Sign into your online banking account to view the check image. Enter the necessary information in QuickBooks Online (Payee and Category).
Make sure to categorize expenses one at a time. Click Add on the right side when you are done with each transaction.
How to categorize deposits (Money In) transactions
Let’s assume that if you haven’t done an entire year of bookkeeping you probably don’t have good records of your sales invoices. If that is the case or if you do not want to manually enter all your invoices into QuickBooks Online, then I’m going to show you how to assign an income category to the amounts in the Received column.
Click on each transaction to edit the transaction. Make sure that you change any categories from Uncategorized Income or Sales of Product Income to the correct income category. There should be no income added to Uncategorized Income or Sales of Product Income. Read this blog post if you have accidentally recorded transactions to uncategorized income.
Choose an “Income” categorize such as Sales Income. Income categories come from the chart of accounts. Read this blog post if you need to know how to set up the chart of accounts.
Expert Tip: Make sure to categorize income one at a time. Click Add on the right side when you are done with each transaction.
What if you don’t know how to categorize a transaction?
If you are not sure how to categorize a transaction, it’s time to enlist some help. You may know a friend who can help you or you may need to hire a professional. Either way, leave the transactions uncategorized until you figure out what to do with them. I recommend that you don’t guess.
All transactions are categorized and added – What’s next?
If you followed all the steps I outlined, you have categorized and added all expense and income transactions into QuickBooks Online for the year. Congratulations on getting so far, you’re almost to the finish line!
Now, you have two options:
- Reconcile and review your transactions yourself. If you choose this option, read my posts on Reconciling accounts in QuickBooks Online and Reviewing Transactions in QuickBooks Online.
- Your second option is to give your tax accountant access to your QuickBooks Online file so that they can review it and reconcile it for you.
When you finish your reconciliations, or have successfully passed it along to your tax accountant, give yourself a treat – you deserve it! (I recommend cheesecake or ice cream). On the other hand, you are probably already realizing the most rewarding intrinsic benefits – relief, peace of mind, and a sense of accomplishment!
I hope that you find this post helpful and that you apply what you learned on how to do a full year of bookkeeping when you need it done yesterday. Remember, doing a year of bookkeeping will take a little while so hang in there! I have shared various tips and tricks for doing your bookkeeping as fast as possible, but you still have to put in the time to get it done. Just be patient and consistent and you’ll be done soon. Please share this post with others if it has helped you and subscribe to our updates to ensure that you get the latest 5 Minute Bookkeeping tips.
The post How to do a full year of bookkeeping when you need it done yesterday – Part 2 appeared first on 5 Minute Bookkeeping.


Comments
Post a Comment