An insider’s tour of QuickBooks Online 2017
Hello there! You may have noticed that QuickBooks Online has recently undergone a bit of a renovation, with a few tweaks here and there. Allow me to serve as your guide as we explore some of the important changes and new additions. Think of this as a tour though a new house, where I will highlight secret passageways between rooms, like the revolving bookcase or hidden panels in the wall – to help you better navigate. A whole slew of shortcuts has been added based on feedback from QBO users like you. So sit back, relax, buckle up, and allow me to give you an insider’s tour of QuickBooks Online 2017.
Goodbye Home screen…hello dashboard
The Home screen is now the Dashboard. Don’t worry! This is just a name change. The Dashboard still contains the same quick snapshot of your company that you expect to see when logging into QBO (Figure 1).
The Plus (+) Sign
- The Quick Create icon (the plus sign) is now in the upper-right corner of the page. It’s the + sign that spins into an X when you click on it (Figure 2). Use this option quickly create transactions.
- Clicking Show More lets you view all of the transactions available in QuickBooks Online – sorted by Customers, Vendors, Employees and Other (Figure 2).
The Gear Icon
The Gear Icon is at the top right corner of your screen, and it lets you perform a multitude of tasks from one easy convenient location (Figure 3). From the Gear Icon, you can…
- Manage your company settings
- Reconcile bank and credit card accounts
- View your audit log (the changes made to transactions and who made those changes)
- Create custom forms
- Create budgets
- Set up recurring transactions
- And much more
The Search Field
- The Search Icon (the magnifying glass) lets you run a quick search for transactions in QBO (Figure 4).
- To search, simply enter your search criteria (like a transaction ID, a date, or a dollar amount).
- Want to go deeper into the details? Then select Advanced Search. For more information, check out our Advanced Search tutorial for How to Find Transactions in QuickBooks Online.
Left Navigation Bar
The Left Navigation Bar lets you work with customers, vendors, transactions, banking transactions, reports, employees, and taxes (Figure 5).
Banking
The Banking section is now near the top of the navigation bar so you can find it more easily (Figure 6). Use this section to add transactions directly to QBO by connecting your bank and credit card accounts.
Sales
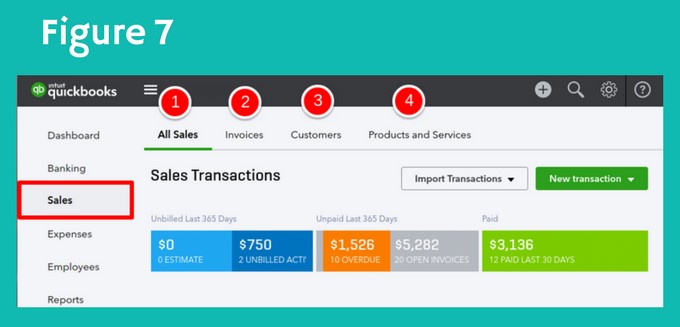
The Sales Center is the place to manage the sales you make to customers. It’s subdivided into four tabs (Figure 7).
- All Sales lists every sales transaction.
- Invoices lists the current status of all your customer invoices, like open, overdue, paid, and deposited.
- The Customers tab is a list of all your customers. You can select an individual customer to view all of the specific customer’s sales transactions.
- The Products and Services tab lists the list of products and/or services that your business sells.
Expenses
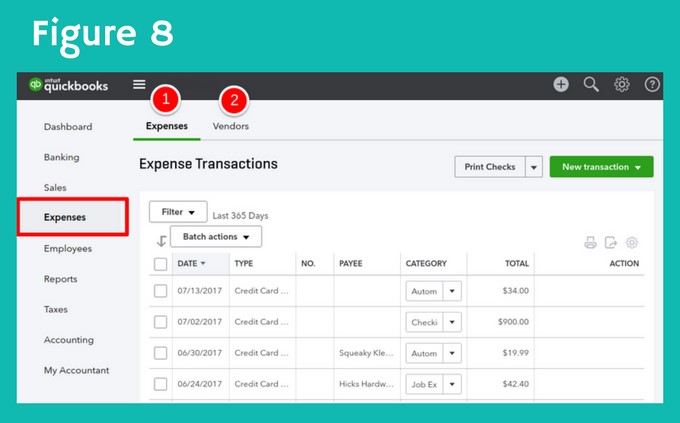
The Expense Center is the place to manage your payments to vendors (No, its not as exciting as the Sales Center, but still important). Two tabs can be found in the Expense Center (Figure 8).
- The Expenses tab lists every expense transaction.
- The Vendors tab lists all of your vendors. Select an individual vendor to view all of their expense transactions.
Employees
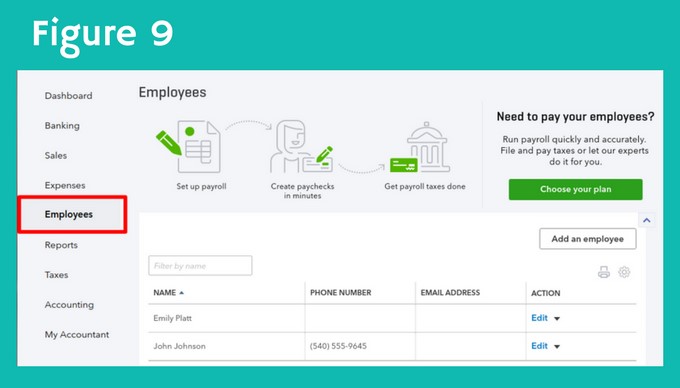
The Employees Center allows you to add and manage your employees. You can enhance your QBO experience by running payroll directly through the Employees Center (Figure 9).
Reports
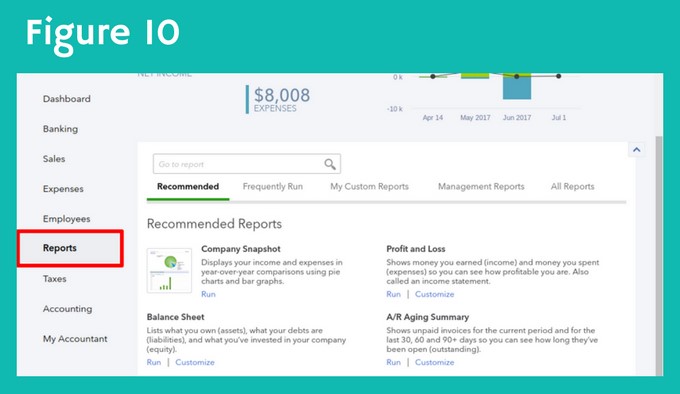
The Reports Center lets you run key reports so you can know your business as well as create custom reports specific to your business needs (Figure 10).
Taxes
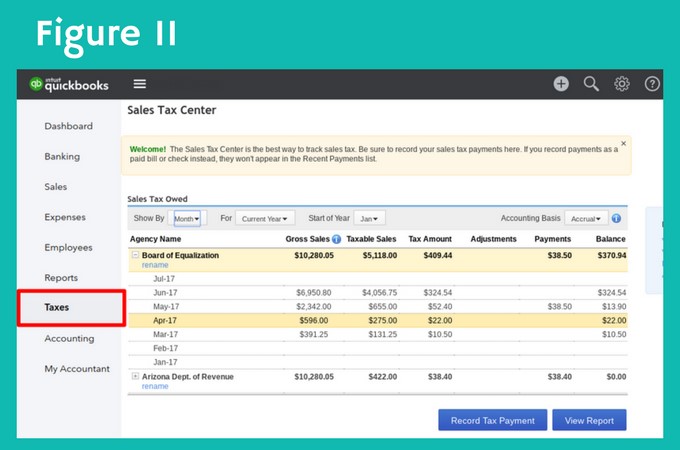
The Taxes Center is where you track your sales tax liability. You also use this center to record your sales tax payments (Figure 11).
Accounting
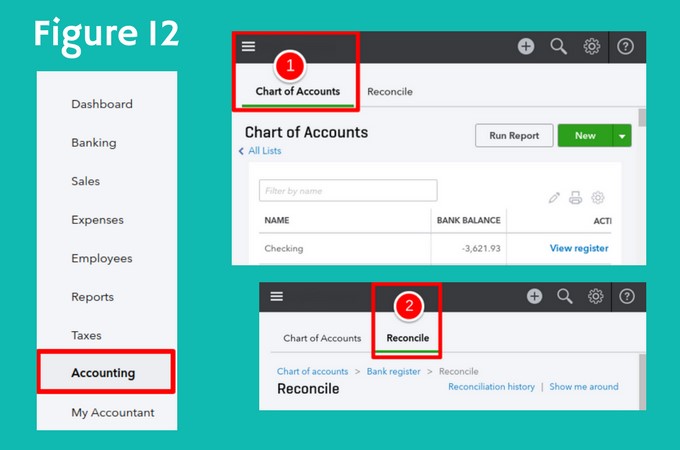
The Accounting Center gives you an overview of your company bank accounts, credit card accounts, as well as your income and expense categorizations (Figure 12). Use this center to…
- View and edit your Chart of Accounts.
- To learn more about your Chart of Accounts, check out this quick tutorial.
- Reconcile your bank and credit card accounts.
- You can now reconcile your bank and credit card accounts in two places (the Gear Icon and the Accounting Center).
My Accountant
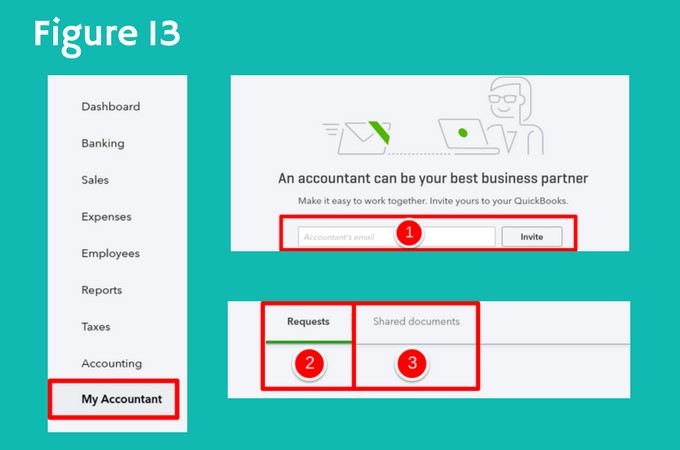
My Accountant is a new tool in QBO you can use to communicate with your accountant (Figure 13).
- First, invite your accountant as a fellow QBO user by entering your accountant’s email.
- Use the Requests tab to respond to your accountant’s requests instead of simply emailing back and fourth.
- Use the Shared Documents tab to upload documents requested by your accountant.
My Accountant is a new tool in QBO you can use to communicate with your accountant.
Click To Tweet
Closing
What an exciting transformation we have witnessed so far from one version to QBO to the next – and now with the ongoing updates to keep it modern and enhance our user experience. I hope you’ve enjoyed this insider’s tour of QuickBooks Online 2017. Keep in mind, that new features are being rolled out every month to make QBO even more user friendly. When you have time, you may just want to take just a moment to explore even more of the new QBO.
The post An insider’s tour of QuickBooks Online 2017 appeared first on 5 Minute Bookkeeping.


Comments
Post a Comment